How to Get Started with Docker
A few months ago, I made a post outlining some of the things I did with docker on an old desktop computer running Linux on it. While that was more of a high-level overview of the process, this will be a more detailed tutorial of the process of creating your first few Docker containers.
But first, what is Docker? AWS, a popular cloud service platform, puts it best when it says that:
Docker is a software platform that allows you to build, test, and deploy applications quickly. Docker packages software into standardized units called containers that have everything the software needs to run including libraries, system tools, code, and runtime. Using Docker, you can quickly deploy and scale applications into any environment and know your code will run.
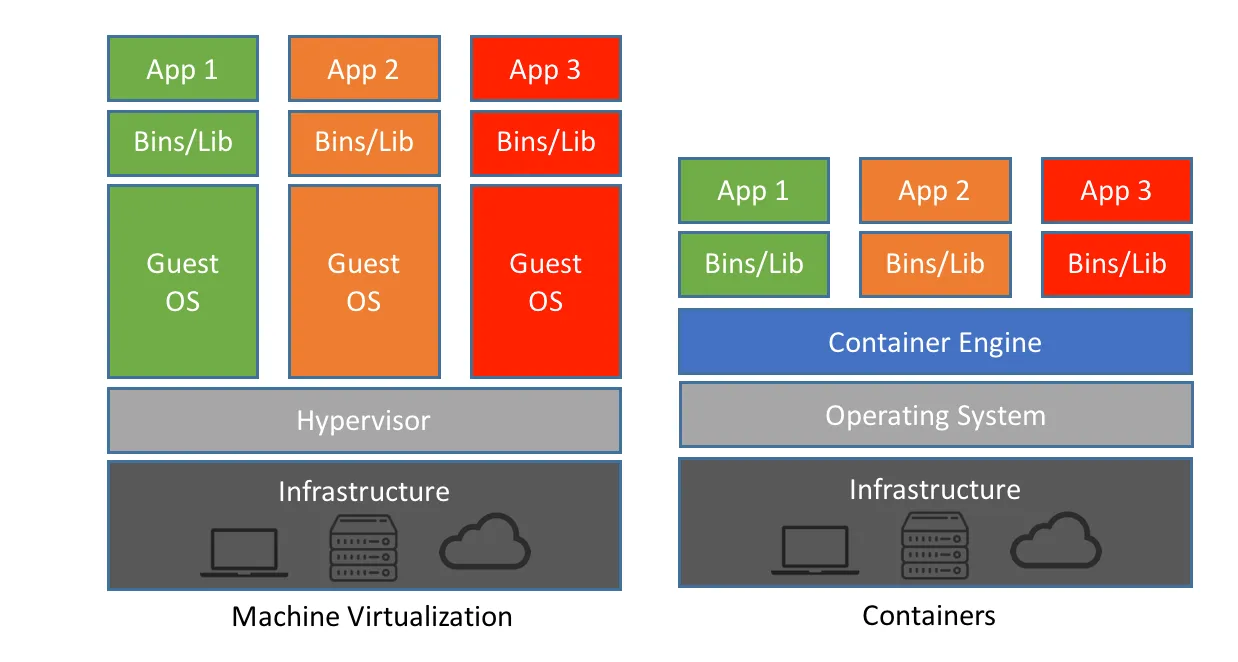
In other words, Docker abstracts programs into virtualized environments called “containers”. These containers are similar to Virtual Machines (VMs), but don’t require the virtualization of an entire guest operating system. Applications virtualized into Docker Containers are much faster than those virtualized into VMs due to less system resources being used. The diagram below summarizes this well, as it shows that the tech stack using containers is much shorter, signifying less overhead. Therefore, more resources can be dedicated to the actual application, rather than unnecessary layers of virtualized operating systems.
One more term you’ll hear referred to in this post is an “image”. An image is simply a set of instructions your computer uses to create a container. You could think of this like a template. For example, there may be a web server image available to use, and you can deploy that image as a container by providing files to host and other information. Most images are hosted on Docker Hub, but it is entirely possible to create your own images. However, that is out of the scope of this article. Anyways, let’s get into it.
Step 0: Initializing your environment.
In this tutorial, I’ll be using Ubuntu Server 22.04 LTS to run Docker. The beauty of Docker is that containers can be deployed to almost any platform – Linux, Windows, or MacOS – and easily transferred between them. This platform independence makes Docker a popular choice for hosting applications. I’ll walk you through the process of setting up an instance of Ubuntu Server in this section, and all later sections will be based off of running Docker in Ubuntu. If you would rather run Docker Desktop, are already running Linux, or would rather use a service such as Linode, feel free to skip this section of the tutorial.
Otherwise, we need to install Ubuntu Server (or another distro of choice) on either a Virtual Machine or bare metal (on a real computer). I’ll be opting for a VM so I don’t have to dust off an old computer, but either will work fine.
Step 1: Download the ISO for Ubuntu Server 22.04 LTS from Canonical’s website. Flash this image to a flash drive using a program like BalenaEtcher if you’re running on bare metal.
Step 2: Install either VirtualBox or VMWare to create a new VM and boot into it, making sure to specify the file you just downloaded. If you’re running on bare metal, insert your flash drive and boot from it.
Step 3: Run through the initial Ubuntu Server setup process that will appear when you first start the machine. Make sure to select the right disk; write down your username, password, and IP address; and enable OpenSSH Server so that you can access the computer remotely. I would recommend SSHing into the computer even if you’re running a VM.
Step 4: Once you see a screen that says something like “Ubuntu 22.04 LTS [hostname] tty1”, you’re able to SSH into the machine. The SSH command is the same on Windows, MacOS, and Linux. You may or may not have to install an SSH client on Windows, refer to this article if the following command doesn’t work.
ssh [username]@[IP address]
Replace [username] and [IP address] with the right values for your machine. If you forgot your IP address, run ip addr | grep inet from the machine itself. It will probably start with 192.168.
Step 5: After logging in with your password, you should be greeted with a prompt that looks like: [username]@[hostname]:~$. If you see this, you’re ready to move on.
Step 1: Install Docker
Now that the hard part of the tutorial is out of the way, we can move on to the good stuff. As previously mentioned, you can use Docker Desktop if you would rather, but I’ll be walking you through how to install the regular-old command line version of Docker on Linux. Luckily, Docker makes it easy for us.
First, let’s make a docker folder in our home directory and enter into it. Then, we will download a script from Docker that makes it very easy to install Docker. Finally, we’ll execute this script with root privileges. Make sure to NEVER run scripts without understanding what they do and verifying that they come from a trusted source.
mkdir ~/docker
cd ~/docker
curl -fsSL https://get.docker.com -o get-docker.sh
sudo sh get-docker.sh
You may also want to add the current user to the docker group, so that you don’t have to specify the sudo keyword before every docker command. Make sure to log out and log back in for this command to work. This is as simple as exiting your SSH session and logging back in.
sudo usermod -aG docker $USER
Step 2: Our First Docker Container
The nice folks over at docker provide a simple image to let us test our docker configuration. If you see the message it displays, then you’ve completed the previous steps correctly. Just run the following command, and wait for it to download the image and execute.
docker run hello-world
Step 3: The Docker Run Command
To start off, let’s make a simple web server using NGINX. First, we have to download the NGINX image from Docker Hub so that we can make a container from it.
docker pull nginx
Next, let’s create some content for the site to display. The best way to do this is to create a folder for our container inside the docker folder we previously created. Then, we can create an index.html file, which contains the code for what our website should look like. We’ll use nano, a text editor, to create this file. I’ve included a sample index.html file below. After pasting the text, you can press ctrl-s and ctrl-q to save and exit.
mkdir ~/docker/nginx
cd ~/docker/nginx
nano index.html
<!doctype html>
<html>
  <head>
    <meta charset="utf-8" />
    <meta name="viewport" content="width=device-width, initial-scale=1" />
    <title>Sample NGINX Website</title>
    <style>
      body {
        font-family: sans-serif;
        margin: 0 80px;
        background-color: #1d1e20;
        color: #dadadb;
      }
    </style>
  </head>
  <body>
    <h1>Sample NGINX Website</h1>
    <p>
      If you’re seeing this page, it means that you have successfully run NGINX
      as a docker container! Good job :)
    </p>
    <img
      src="https://images.pexels.com/photos/3761504/pexels-photo-3761504.jpeg"
      alt="Man Sitting on a Green Grass Field"
      width="500"
    />
  </body>
</html>
But before we actually run this container, we must understand the docker run command. The syntax of this command is as follows: docker run [OPTIONS] IMAGE [COMMAND]. We have to specify a new options depending on the container:
- The port argument lets us link a port on our host machine with one in our container.
- Syntax:
-p [host]:[container] - Example:
-p 8080:80
- Syntax:
- Similarly, the volume argument lets us link together a volume (either a single file or a folder) on our host machine with one in our container.
- I would recommend having all the volumes for a container within the same folder on your host machine, and having that folder be contained within a docker folder in your home directory.
- You can also make the volume read-only by putting
:rodirectly after specifying the volume paths. - Syntax:
-v [host]:[container] - Example:
-v ~/docker/nginx:/usr/share/nginx/html:ro
- The restart argument lets us specify what the container should do if the Docker daemon (aka background process) restarts. Read the full syntax here.
- Syntax:
--restart [no|on-failure|unless-stopped|always] - Example:
--restart always
- Syntax:
- The name argument lets us assign a name to the container.
- If this is not specified, a random name is assigned.
- Syntax:
--name [name]
- The detach argument lets us run the container in the background.
- Syntax:
--detachor-d
- Syntax:
Now, we can use these arguments to finally run the container.
docker run -p 8080:80 -v ~/docker/nginx:/usr/share/nginx/html:ro --restart always --name nginx -d nginx
If you type in [IP Address]:8080 into your browser, you should see the index.html page we created earlier.
Step 3: Using Docker Compose
Okay, okay, that was cool and all, but the docker run command is trash! Not really, but there is a better option so that we can more easily edit the parameters we use to create our docker container.
First, let’s remove the container we just made.
docker stop nginx
docker rm nginx
Next, let’s go back to our docker folder and create a new file called docker-compose.yaml. This compose file contains the same information we provided to the ‘docker run’ command, but allows us to save this information for later use. If we want to redeploy this container, we just need this file to tell docker what to do, instead of hunting down a long command that’s difficult to read.
cd ~/docker/nginx
nano docker-compose.yaml
version: "3"
services:
  nginx:
    image: nginx
    container_name: nginx
    volumes:
      - ~/docker/nginx:/usr/share/nginx/html:ro
    ports:
      - 8080:80
    restart: always
Now, all we have to do is run the command docker compose up -d. There is some additional nuance with the difference between “docker compose” and “docker-compose”, but for the purposes of this tutorial, we’ll use the newer version without the hyphen. After running the command, you should be able to navigate to the same URL as before, and see the same website.
Once you are done, make sure to stop and remove the container with the docker stop nginx and docker rm nginx commands as before.